Oracle WebCenter Portal's round-trip development features provide a simple, convenient way to create and modify Oracle WebCenter Portal assets without redeploying the entire application. Round-trip development refers to features and techniques that allow you to download assets from Oracle WebCenter Portal and upload them to Oracle JDeveloper for maintenance or enhancement. Once an asset has been modified, you can upload it back to Oracle WebCenter Portal for immediate use or for testing.
In this article you will learn how to set up your development environment for Oracle WebCenter 11.1.1.8.
Examples in this article use an environment that has Oracle WebLogic Server, Oracle WebCenter Portal, and Oracle WebCenter Content installed and running.
The installation of Oracle JDeveloper occurs on a laptop with Windows 7 OS.
JDeveloper Installation and Configuration
- Download and install JDeveloper 11.1.1.7
- As of September 26, 2013, this is the most recent version of JDeveloper that supports asset development for Oracle WebCenter Portal 11.1.1.8
- JDeveloper 11.1.2.X.X versions do not support WebCenter development JDeveloper was installed in this path: C:\Oracle\Middleware\11117
That path will be referenced throughout this article, but may be different based on your installation.
- Open JDeveloper.
- Install the Oracle WebCenter 11.1.1.8 Portal Extension for JDeveloper.
- Help —> Check For Updates
- Search for Oracle WebCenter Portal extension (version 11.1.1.8.0)
- Select the extension, then click Finish
- Restart JDeveloper
- Download the portal asset development workspace from OTN:
- http://download.oracle.com/otndocs/tech/webcenter/files/DesignWebCenterSpaces_11.1.1.8.0.zip
- This folder is a JDeveloper application that you will connect to your WebCenter instance for direct download and upload.
This ZIP file was downloaded to: C:\Users\MPALSKI\Downloads.
This path will be referenced for the rest of this article. - Unzip DesignWebCenterSpaces_11.1.1.8.0.zip to C:\Users\MPALSKI\Downloads\DesignWebCenterSpaces_11.1.1.8.0
- Copy the workspace WLST scripts to your JDeveloper instance.
- Navigate to: C:\Users\MPALSKI\Downloads\DesignWebCenterSpaces_11.1.1.8.0\copy_to_common\common
- Select the folders script_handlers and wlst and copy them
- Navigate to: C:\Oracle\Middleware\11117\oracle_common\common
- Paste the folders into common to replace the existing script_handlers and wlst folders (Figure 1).

Figure 1
- Copy the workspace JAR file to your JDeveloper extensions library.
- Navigate to: C:\Users\MPALSKI\Downloads\DesignWebCenterSpaces_11.1.1.8.0\copy_to_jdev_ext
- Right-click and copy oracle.webcenter.portal.jar
- Navigate to: C:\Oracle\Middleware\11117\jdeveloper\jdev\extensions
- Rename oracle.webcenter.portal.jar to oracle.webcenter.portal_old.jar.
- Paste oracle.webcenter.portal.jar into the folder (Figure 2).

Figure 2
- Copy the workspace into your JDeveloper folder.
- Navigate to: C:\Users\MPALSKI\Downloads\DesignWebCenterSpaces_11.1.1.8.0
- Copy the DesignWebCenterSpaces folder.
- Navigate to: C:\JDeveloper\mywork.
- Note that this is NOT the same location as your JDeveloper installation folder.
- Paste the workspace into the mywork folder.
- Restart JDeveloper.
- Close JDeveloper
- Re-open JDeveloper
Workspace Configuration
- Open the workspace:
- Open JDeveloper
- Navigate to File —> Open
- Navigate to C:\JDeveloper\mywork\DesignWebCenterSpaces
- Select DesignWebCenterSpaces.jws
- Click the Open button.
- Open connection properties file:
- Expand WebCenterSpacesExtensionLibrary
- Expand Resources
- Expand WebCenterSpacesExtensionLibrary
- Open config.properties by double-clicking the file (Figure 3).

Figure 3
- Set connection properties:
- Follow the instructions in this file that display in green and are prefixed with a # so that they are commented out.
- For reference, here are some example values:
- jdeveloper.install.home.directory=C:\\Oracle\\Middleware\\11117
- wlst.executable=wlst.cmd
- extending.spaces.home.dir=C:\\JDeveloper\\mywork\\DesignWebCenterSpaces
- oracle.jdeveloper.ojdeploy.path=${jdeveloper.install.home.directory}/jdeveloper/jdev/bin/ojdeploy
- wls.port=7001
- wls.host=<IP address>
- wc.port=8888
- wc.host= <IP address>
- wc.protocol=http
- Create User Key and User Config files:
- Navigate to your wlst.cmd file
- C:\Oracle\Middleware\11117\oracle_common\common\bin
- Double-click wlst.cmd
- Connect to the admin server
- connect('weblogic','welcome1','<IP address>:7001')
- Enter the following command
- storeUserConfig('C:/myFiles/myuserconfigfile.secure', 'C:/myFiles/myuserkeyfile.secure')
- When prompted, enter Y and then hit Enter (Figure 4).
- Navigate to your wlst.cmd file

Figure 4
- Complete connection properties:
- wls.userkey=C:\\myFiles\\myuserkeyfile.secure
- wls.userconfig=C:\\myFiles\\myuserconfigfile.secure
- wls.target=WC_Spaces,AdminServer
- wls.webcenter.app.target=WC_Spaces
- webcenter.app.name=webcenter
- restart.implementation.version.suffix=2
- restart.implementation.version.suffix.ear=2
- Test the connection:
- Navigate to WebCenterSpacesResources\Web Content\oracle\webcenter\siteresources\scopedMD\s8bba98ff_4cbb_40b8_beee_296c916a23ed\navigation\gsra789be69_045e_40dc_9884_c9d30e78a90b\Navigation.xml
- Right-click Navigation.xml
- Select "Upload Portal Resource to server…" (Figure 5).

Figure 5 - Enter your admin username and password. The default values are (Figure 6):
- Username: weblogic
- Password: welcome1
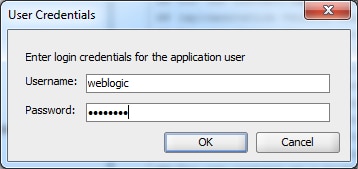
Figure 6 - A confirmation dialogue box will display (Figure 7):
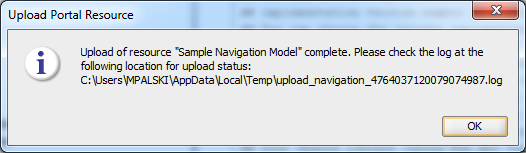
Figure 7
Downloading Assets
- In
the Navigator, right-click the WebCenterSpacesResources project and
then select Download Portal Resource from Server. You may be prompted to
enter a username and password.
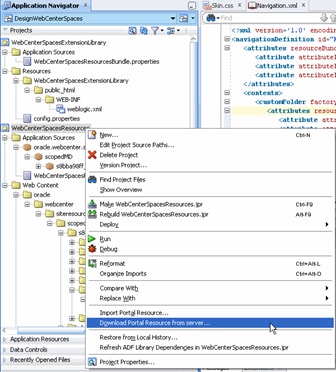
Figure 8 - In the Download Portal Resources dialogue, choose to download either a shared asset (Application-Level Resource) or a portal asset (Portal-Level Resource).
- To filter the list of possible
asset names, select the type of asset you wish to download from the
Resource Type menu (Figure 9).

Figure 9 - Finally, select the name of the asset you wish to download from the Resource Name menu.
- Click the OK button. A progress bar will appear and then a confirmation will display (Figure 10).

Figure 10 - You can check the log file to confirm that the download completed successfully. Your log file should resemble Figure 11.
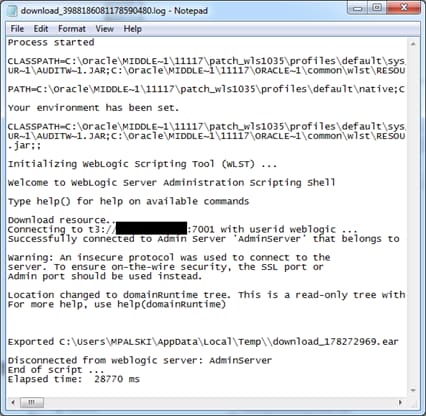
Figure 11 - The
asset that you selected will now appear in your JDeveloper project. In
the following example screen shots, a Page Template was downloaded
(Figure 12).
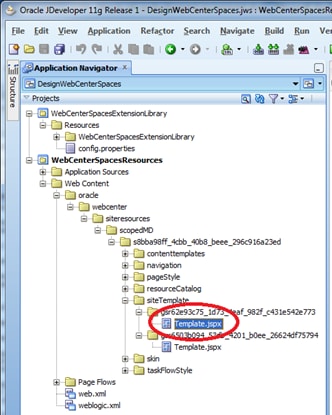
Figure 12 - To ensure you are viewing the same asset that you just downloaded, right-click the asset and select Update Portal Resource (Figure 14). The display name will match the Resource Name that you selected during download (step #3 in this section).
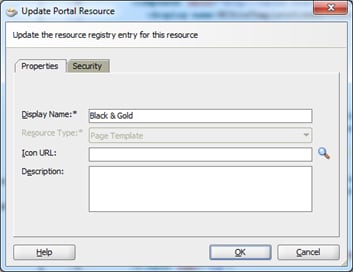
Figure 13 - Click Cancel to close the dialogue and return to your project for resource development.
Editing Portal Resources in JDeveloper
To learn more about building assets, read the appropriate chapters in the Oracle WebCenter Documentation:- Page Templates - Developing Page Templates
- Page Styles - Developing Page Styles
- Skins - Developing Skins
- Navigations - Developing a Navigation Model
- Content Presenter Display Templates - Creating Content Presenter Display Templates
- Resource Catalogs - Developing Resource Catalogs
- Task Flow Styles - Developing Task Flow Styles
Backing Up Your Resources
Sometimes, you may want to create a backup copy of a portal asset. For instance, it would be wise to back up a portal asset before uploading a new version of it in case your development causes unintended results.Portal resources are saved as EAR files. To save a copy of a portal asset, follow these steps:
- Navigate to the Administration page.
- Select Shared Assets in the top-navigation.
- Select an asset category from the left-navigation.
- Navigate to the resource you wish to back up, right-click, and select download (Figure 14).

Figure 14 - In the Download dialogue box, click Download to save the EAR file to your local machine (Figure 15).
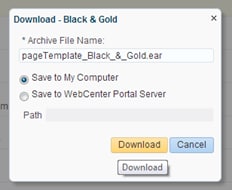
Figure 15 - You have now successfully made a backup copy of that portal resource.
Restoring Your Backup
To restore your backup copy of the resource, simply return to the Administration interface and use the Upload button to import the backup EAR file that you downloaded (Figure 16).
Figure 16
- Delete the asset that was already imported into JDeveloper by right-clicking it and selecting Delete (Figure 17).
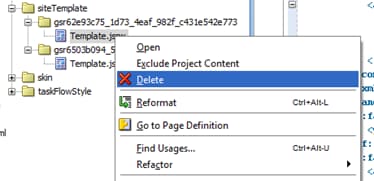
Figure 17 - Follow the steps in this article to download the resource to your JDeveloper project from WebCenter.
Conclusion
Out-of-the-box, Oracle WebCenter Portal provides tools knowledge workers and developers with the tools to quickly and easily create portals, intranets, extranets, and self-service applications that offer users a more effective and efficient way to access and interact with information, business applications, and process. Oracle WebCenter Portal can be customized using browser-based tools and JDeveloper.JDeveloper can be used to develop components that can be deployed and used in Oracle WebCenter Portal. Components can be ADF task flows, data controls,managed beans, and such other assets as skins, page styles, task flow styles, page templates, content-present display templates, navigations, and resource catalogs.
Enabling direct upload/download between JDeveloper and Oracle WebCenter Portal makes iterative asset development quicker and easier for your development team.
By leveraging the indirect process of downloading a portal asset as an EAR file, development teams can back up portal assets before deploying a new version to their environment.
Reference : http://www.oracle.com/technetwork/articles/enterprise2/palski-jdeveloper-webcenter-2062770.html